socks5服务端部署配置

1.基础服务器环境
8核-16GB-100GB,CentOS 7.9;
2.更新YUM源
因为centos已经停止维护了,yum已经全部停止维护了,需要更换为国内的源,这里说下更改为阿里云yum源的方法;
(1)先去阿里云镜像站下载centos7的yum,地址为 http://mirrors.aliyun.com/repo/, 下载到本地后更名为CentOS-Base.repo,然后上传到服务器文件夹下,这里我上传到/home/centos文件夹中
[root@obd-centos-ss5 centos]# ll
total 4
-rw-rw-r--. 1 centos centos 2523 Nov 6 02:49 CentOS-Base.repo
(2)将centos的源yum文件更名为CentOS-Base.repo.bak
[root@obd-centos-ss5 centos]# sudo mv /etc/yum.repos.d/CentOS-Base.repo /etc/yum.repos.d/CentOS-Base.repo.bak(3)将/home/centos/CentOS-Base.repo拷贝到/etc/yum.repos.d/中
[root@obd-centos-ss5 centos]# cp /home/centos/CentOS-Base.repo /etc/yum.repos.d/CentOS-Base.repo
[root@obd-centos-ss5 centos]# ll /etc/yum.repos.d/
total 44
-rw-r--r--. 1 root root 2523 Nov 6 02:51 CentOS-Base.repo
-rw-r--r--. 1 root root 1664 Nov 6 02:50 CentOS-Base.repo.bak
-rw-r--r--. 1 root root 1309 Nov 23 2020 CentOS-CR.repo
-rw-r--r--. 1 root root 649 Nov 23 2020 CentOS-Debuginfo.repo
-rw-r--r--. 1 root root 314 Nov 23 2020 CentOS-fasttrack.repo
-rw-r--r--. 1 root root 630 Nov 23 2020 CentOS-Media.repo
-rw-r--r--. 1 root root 1331 Nov 23 2020 CentOS-Sources.repo
-rw-r--r--. 1 root root 8515 Nov 23 2020 CentOS-Vault.repo
-rw-r--r--. 1 root root 616 Nov 23 2020 CentOS-x86_64-kernel.repo
(4)yum操作,依次执行以下命令来更新升级yum仓库:
[root@obd-centos-ss5 centos]# yum clean all && yum makecache && yum update -y
Loaded plugins: fastestmirror
Cleaning repos: base extras updates
Loaded plugins: fastestmirror
Determining fastest mirrors
* base: mirrors.aliyun.com
* extras: mirrors.aliyun.com
* updates: mirrors.aliyun.com
base | 3.6 kB 00:00:00
extras | 2.9 kB 00:00:00
updates | 2.9 kB 00:00:00
......
3.下载ss5-3.8.9-8.tar.gz
下载地址:https://jaist.dl.sourceforge.net/project/ss5/ss5/3.8.9-8/,下载到本地后再上传到/home/centos文件夹下
[root@obd-centos-ss5 centos]# ll
total 384
-rw-rw-r--. 1 centos centos 2523 Nov 6 02:49 CentOS-Base.repo
-rw-rw-r--. 1 centos centos 387680 Nov 6 03:02 ss5-3.8.9-8.tar.gz
4.下载ss5前置组件
[root@obd-centos-ss5 centos]# yum install -y gcc openldap-devel make wget pam-devel openssl-devel
Loaded plugins: fastestmirror
Loading mirror speeds from cached hostfile
* base: mirrors.aliyun.com
* extras: mirrors.aliyun.com
* updates: mirrors.aliyun.com
Resolving Dependencies
......
5.解压ss5
[root@obd-centos-ss5 centos]# tar -xvzf ss5-3.8.9-8.tar.gz
ss5-3.8.9/
ss5-3.8.9/install-sh
ss5-3.8.9/include/
ss5-3.8.9/include/config.h.in
ss5-3.8.9/include/SS5Server.h
ss5-3.8.9/include/SS5Mod_filter.h
......
6.SS5编译安装
(1)进入/home/centos/ss5-3.8.9文件夹下
[root@obd-centos-ss5 ss5-3.8.9]# ll
total 304

drwxr-xr-x.  3 root root     19 Aug 26  2011 admin

drwxr-xr-x.  2 root root    100 Aug 26  2011 build

-rw-r--r--.  1 root root  15691 Jan 11  2012 ChangeLog

drwxr-xr-x.  2 root root     99 Jan 11  2012 common

drwxr-xr-x.  3 root root    107 Aug 26  2011 conf

-rwxr-xr-x.  1 root root 218560 Jan 11  2012 configure

-rw-r--r--.  1 root root   7932 Jan 11  2012 configure.ac

drwxr-xr-x.  4 root root    136 Aug 26  2011 doc

drwxr-xr-x.  2 root root   4096 Jan 11  2012 include

-rw-r--r--.  1 root root   3285 Aug 26  2011 INSTALL

-rw-r--r--.  1 root root   9206 Aug 26  2011 install-sh

-rw-r--r--.  1 root root  18005 Aug 26  2011 License

-rw-r--r--.  1 root root    547 Jan 10  2012 License.OpenSSL

-rw-r--r--.  1 root root   9694 Aug 26  2011 Makefile.in

drwxr-xr-x.  5 root root     47 Aug 26  2011 man

drwxr-xr-x. 13 root root    247 Jan 11  2012 modules

-rw-r--r--.  1 root root    176 Aug 26  2011 SOLARIS.NOTES

drwxr-xr-x.  2 root root    209 Jan 11  2012 src

-rw-r--r--.  1 root root     60 Aug 26  2011 TODO

drwxr-xr-x.  2 root root     23 Jan 11  2012 tool
(2)依次执行如下命令,进行ss5的编译安装
[root@obd-centos-ss5 ss5-3.8.9]# ./configure && make && make install

checking for gcc... gcc

checking for C compiler default output file name... a.out

checking whether the C compiler works... yes

checking whether we are cross compiling... no

checking for suffix of executables...

checking for suffix of object files... o

checking whether we are using the GNU C compiler... yes

checking whether gcc accepts -g... yes

checking for gcc option to accept ISO C89... none needed

checking for a BSD-compatible install... /bin/install -c

checking for main in -ldl... yes

checking for main in -lldap... yes

......[root@obd-centos-ss5 ss5-3.8.9]# ./configure && make && make install

checking for gcc... gcc

checking for C compiler default output file name... a.out

checking whether the C compiler works... yes

checking whether we are cross compiling... no

checking for suffix of executables...

checking for suffix of object files... o

checking whether we are using the GNU C compiler... yes

checking whether gcc accepts -g... yes

checking for gcc option to accept ISO C89... none needed

checking for a BSD-compatible install... /bin/install -c

checking for main in -ldl... yes

checking for main in -lldap... yes

......
7.ss5文件提权
[root@obd-centos-ss5 ss5-3.8.9]# chmod a+x /etc/init.d/ss5

[root@obd-centos-ss5 ss5-3.8.9]# chmod a+x /etc/rc.d/init.d/ss5
8.修改ss5为账户口令认证登录
(1)备份ss5.conf配置文件
[root@obd-centos-ss5 ss5-3.8.9]# cp /etc/opt/ss5/ss5.conf /etc/opt/ss5/ss5.conf.bak
(2)修改ss5.conf配置文件
[root@obd-centos-ss5 ss5-3.8.9]# vim /etc/opt/ss5/ss5.conf
去掉auth 0.0.0.0/0 - -前的注释#,第二个-改为u,如下所示
# ///////////////////////////////////////////////////////////////////////////////////

#       SHost           SPort           Authentication

#

auth    0.0.0.0/0               -               u

#

# SECTION       <BANDWIDTH>

# \\\\\\\\\\\\\\\\\\\\\\\\\\\\\\\\\\\\\\\\\\\\\\\\\\\\\\\\\\\\\\\\\\\\\\\\\\\\\\\\\\\
去掉permit - 0.0.0.0/0 - 0.0.0.0/0 - - - - -前的注释#,将第1个-改为u,如下所示
# /////////////////////////////////////////////////////////////////////////////////////////////////

#      Auth     SHost           SPort   DHost           DPort   Fixup   Group   Band    ExpDate

#

permit u        0.0.0.0/0       -       0.0.0.0/0       -       -       -       -       -

#

# SECTION       <PROFILING>

# \\\\\\\\\\\\\\\\\\\\\\\\\\\\\\\\\\\\\\\\\\\\\\\\\\\\\\\\\\\\\\\\\\\\\\\\\\\\\\\\\\\\\\\\\\\\\\\\\
9.修改ss5的缺省端口号
[root@obd-centos-ss5 ss5-3.8.9]# vi /etc/sysconfig/ss5去掉第二行注释,添加-b 0.0.0.0:55555,如下所示
# Add startup option here

SS5_OPTS=" -u root -b 0.0.0.0:55555"
10.添加ss5的认证账户和口令
[root@obd-centos-ss5 ss5-3.8.9]# vi /etc/opt/ss5/ss5.passwd
前面为账户,后面为口令,如下所示
test testtest
11.开机启动ss5
[root@obd-centos-ss5 ss5-3.8.9]# chkconfig --add ss5

[root@obd-centos-ss5 ss5-3.8.9]# service ss5 start

Starting ss5 (via systemctl):                              [  OK  ]
12.服务器端口测试
查看本地55555端口是否为监听状态
[root@obd-centos-ss5 ss5-3.8.9]# netstat -an | grep 55555

tcp        0      0 0.0.0.0:55555           0.0.0.0:*               LISTEN
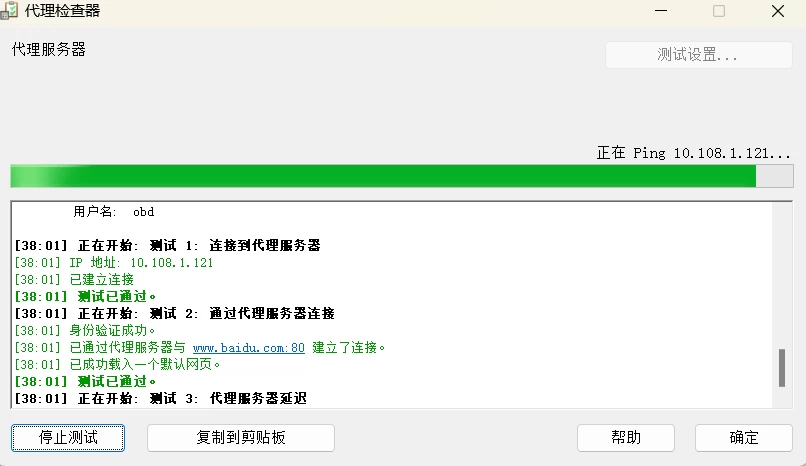
13 proxifier测试

相关文件下载
为了便于同学进行下载、测试,这里放出centos7的yum源repo包、ss5的安装包,以及proxifier的汉化安装包:
centos7 yum源repo包
ss5安装包
proxifier汉化安装包
至此,socks5的配置教程结束,如有问题,欢迎留言讨论~


